How Metadata Removes the Clutter from SharePoint Sites
SharePoint’s purpose has always been to make it easier for people to access files and collaborate. However, we’ve seen many SharePoint sites that, while accessible, are far from easy.
Too often SharePoint sites are being overwhelmed by folders. It makes sense as people are used to organizing documents via a folder structure. Familiar or not, this habit can make searching SharePoint for a particular file much harder than it needs to be.
Instead of going through layer after layer of folders, SharePoint users have a better, more effective option: metadata, which can be defined as “data about data.” It doesn’t take a web developer to incorporate metadata and doing so can make SharePoint sites more searchable and collaboration more efficient.
Making the case for SharePoint metadata
Let’s dive in deep to the benefits of metadata:
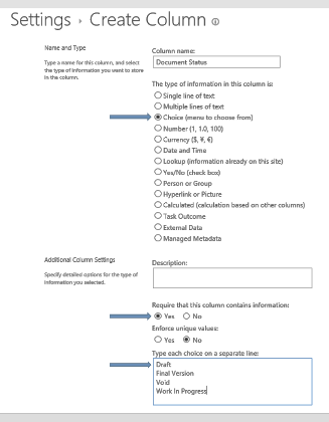
- Freedom from folders. Metadata allows organizations to forget the folders and subfolders and sub-subfolders should they so choose. Information often conveyed through folder names can be organized into metadata columns. These columns are sortable and filterable. They can be displayed in any view and can identify things like document type, date created, document status (draft, final version), etc. To add a metadata column, simply:
- Click on “Create Column” in Library Settings.
- Give the column a name, such as “Document Type,” select “Choice” as the column type, then add each choice on a separate line in the box.
- Tip: Alphabetize the choices, it makes it easier for the users to find the correct choice.

- Ensure consistent usage. The benefits of metadata will be limited without everyone sticking to the conventions an organization has laid out. Organizations can ensure users are including all desired metadata by making it mandatory. The following steps make it so a file can’t be saved unless a specific metadata column is filled out:
- Navigate to the Library Settings.
- Select the column by clicking on the column name and you can make the column mandatory by selecting the Yes radio button under “Require that this column contains information”
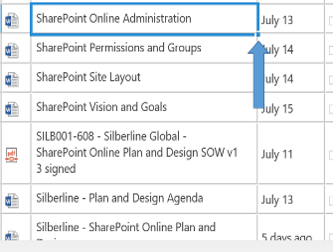
- Easy to hit the ground running. The good news for time-strapped users is SharePoint makes it easy to get going with metadata. For example, if multiple files fall under the “Marketing Materials” document type, it’s possible to enter that info once. After a column has been added and the choices for that column configured, switch to the Quick Edit view, (also known as the Datasheet view). This view brings up a grid that looks similar to an Excel spreadsheet. When you click in one of the cells, you will see that the cell gets highlighted with a border. Click and hold on the tiny square at the bottom right corner of the box and drag the box down through all applicable rows. The values from the box get copied down to all the cells you’ve highlighted (just like in Excel). This saves time, especially when adding multiple documents of the same type or during the early stages of a SharePoint reorganization.

- Amp up SharePoint searches. SharePoint searches already had an advantage over other options (such as File Explorer) in that they scan the entire text of a document, not just the title. This already robust option is amplified by the use of metadata. SharePoint considers this info in searches to provide users with better and more accurate results.
Metadata: Time-saver or time drain?
One of the common counterarguments to metadata use is “I don’t have time for that!” Some users see filling in those extra columns when uploading a document to SharePoint as a time drain. In actuality, the opposite is true. Metadata seeks to eliminate the tedious process of digging through multiple levels of folders.
Want to learn more about how to optimize your organization’s SharePoint site? Have questions about how to become a more efficient SharePoint user? Our Microsoft team can be reached at: http://www.arrayasolutions.com/contact-us/.
Or reach out to Arraya Solutions on social media: Twitter, LinkedIn, and Facebook.
